Linux gcc编译生成静态库和共享动态库的过程
这篇文章主要通过实例演示在Linux下如何使用gcc分别编译生成静态库和动态库文件以及其它程序如何使用这个生成的静态库和动态库。
1 要用到的3个测试程序
1、头文件hello.h:
1 2 3 4 | |
2、hello.c程序:
1 2 3 4 5 6 7 8 | |
3、主程序main.c:
1 2 3 4 5 6 | |
2 生成静态库文件
使用如下两个命令即可把.o目标文件聚合成.a静态库文件:
[root@typecodes howto_gen_static_lib]# ls
hello.c  hello.h  main.c

####生成目标文件 hello.o
[root@typecodes howto_gen_static_lib]# gcc -c hello.c
[root@typecodes howto_gen_static_lib]# ls
hello.c  hello.h  hello.o  main.c

#####生成静态库文件 libmyhello.a
[root@typecodes howto_gen_static_lib]# ar rcs libmyhello.a hello.o
[root@typecodes howto_gen_static_lib]# ls
hello.c  hello.h  hello.o  libmyhello.a  main.c
那么如何使用生成的静态库文件呢?这里以main.c中调用静态库文件并生成最终的可执行文件hello为例:
[root@typecodes howto_gen_static_lib]# gcc -o hello main.c libmyhello.a
####或者类似于动态共享库
[root@typecodes howto_gen_static_lib]# gcc -o hello main.c -L . -lmyhello
[root@typecodes howto_gen_static_lib]# gcc -o hello main.c -static -L. -lmyhello
注意:如果出现下面这个错误,那么是由于程序链接需要静态库,系统没有安装静态库导致报错:
[root@typecodes howto_gen_static_lib]# gcc -o hello main.c -static -L. -lmyhello
/usr/bin/ld: cannot find -lc
collect2: error: ld returned 1 exit status
[root@typecodes ~]# yum info glibc-static
Loaded plugins: axelget, fastestmirror, langpacks
No metadata available for base
No metadata available for epel
No metadata available for extras
No metadata available for updates
Loading mirror speeds from cached hostfile
 * base: mirrors.aliyun.com
 * epel: mirrors.yun-idc.com
 * extras: mirrors.aliyun.com
 * updates: mirrors.aliyun.com
Available Packages
Name        : glibc-static
Arch        : i686
Version     : 2.17
Release     : 106.el7_2.1
Size        : 1.2 M
Repo        : updates/7/x86_64
Summary     : C library static libraries for -static linking.
URL         : http://www.gnu.org/software/glibc/
License     : LGPLv2+ and LGPLv2+ with exceptions and GPLv2+
Description : The glibc-static package contains the C library static libraries
            : for -static linking.  You don't need these, unless you link statically,
            : which is highly discouraged.

Name        : glibc-static
Arch        : x86_64
Version     : 2.17
Release     : 106.el7_2.1
Size        : 1.5 M
Repo        : updates/7/x86_64
Summary     : C library static libraries for -static linking.
URL         : http://www.gnu.org/software/glibc/
License     : LGPLv2+ and LGPLv2+ with exceptions and GPLv2+
Description : The glibc-static package contains the C library static libraries
            : for -static linking.  You don't need these, unless you link statically,
            : which is highly discouraged.
解决方法:使用如下命令,安装glibc-static程序即可。
[root@typecodes howto_gen_static_lib]# yum -y install glibc-static
[root@typecodes howto_gen_static_lib]# ls
hello  hello.c  hello.h  hello.o  libmyhello.a  main.c

#####运行可执行文件即可
[root@typecodes howto_gen_static_lib]# ./hello
Hello everyone!
[root@typecodes howto_gen_static_lib]#
3 生成动态库文件
可以如下面3.1小节所示通过gcc直接生成动态库文件,也可以像3.2小节中那样依次生成realname、soname、linkname库文件。不经常更新动态库版本的话,一般会采用3.1小节中的做法;版本更新较频繁的动态库,诸如MySQL的一些动态库就是采用的3.2小节中的做法。
3.1 直接编译生成symbolic link动态库文件
##### 生成hello.o目标文件
[root@typecodes ~]# gcc -c -fPIC hello.c
##### 生成动态库文件libmyhello.so
[root@typecodes ~]# gcc -shared -fPIC -o libmyhello.so hello.o
##### main.c调用动态库文件并生成可执行文件hello
[root@typecodes ~]# gcc -o hello main.c -L. -lmyhello
##### 如果直接执行程序则会报错
[root@typecodes ~]# ./hello
./hello: error while loading shared libraries: libmyhello.so: cannot open shared object file: No such file or directory
如下图所示,可执行文件hello找不到链接的动态库libmyhello.so而报错:
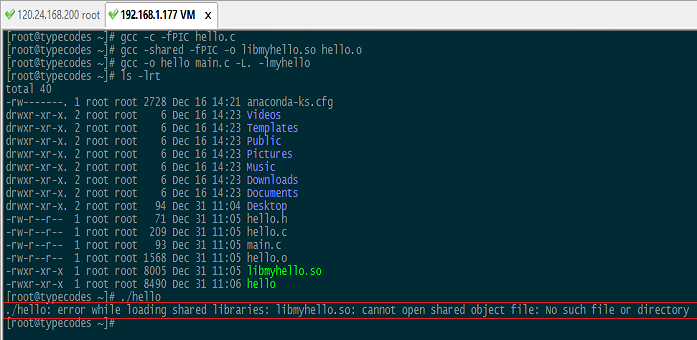
原因分析:使用ldd hello命令查看可执行文件hello依赖的动态库libmyhello.so,结果是not found。

解决方法一:使用root用户把自己生成的动态共享库路径添加系统动态库中即可。
##### ldconfig更新配置文件目录下的所有动态链接库为Linux系统所共享
[root@typecodes ~]# echo "/root/">/etc/ld.so.conf.d/test.conf
[root@typecodes ~]# ldconfig
##### 运行可执行文件
[root@typecodes ~]# ./hello
Welcome to typecodes.com.
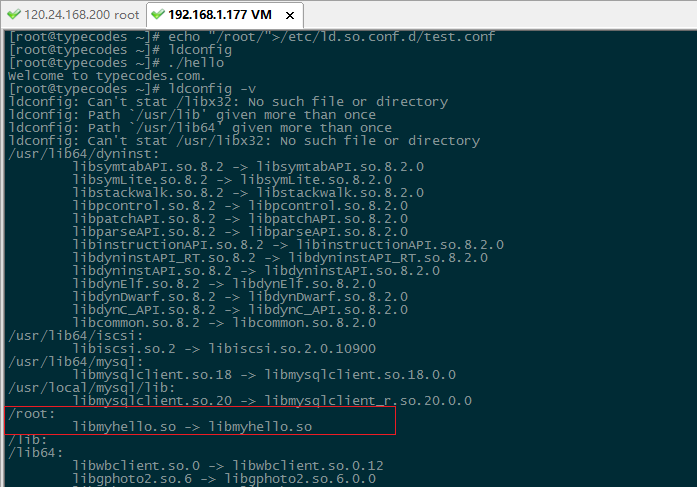
这时使用ldconfig -v命令查看系统动态库的搜索路径,可以看到libmyhello.so.1动态库所在的路径为绝对路径/root/:
3.2 先生成real name动态库文件,然后创建soname软连接,最后创建link name软链接
##### 生成hello.o目标文件
[root@typecodes ~]# gcc -c -fPIC hello.c
##### 生成共享库:对应real name是libmyhello.so.1.0.1, 对应soname是libmyhello.so.1
[root@typecodes ~]# gcc -g -shared -Wl,-soname,libmyhello.so.1 -o libmyhello.so.1.0.1 hello.o
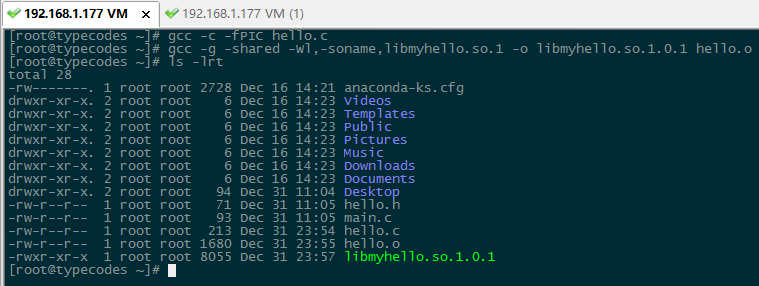
如下图所示,使用readelf -d libmyhello.so.1.0.1命令查看动态库libmyhello.so.1.0.1的信息,可以看到对应的soname为libmyhello.so.1:

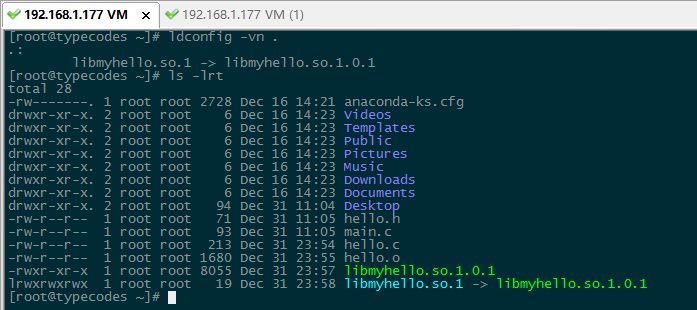
如下图所示,使用ldconfig -vn .命令在当前目录自动生成一个软链接:将soname(libmyhello.so.1)链接到real name(libmyhello.so.1.0.1)。
如下图所示,使用ln -sf libmyhello.so.1 libmyhello.so命令创建链接到soname的共享库文件名(Link Name):libmyhello.so。
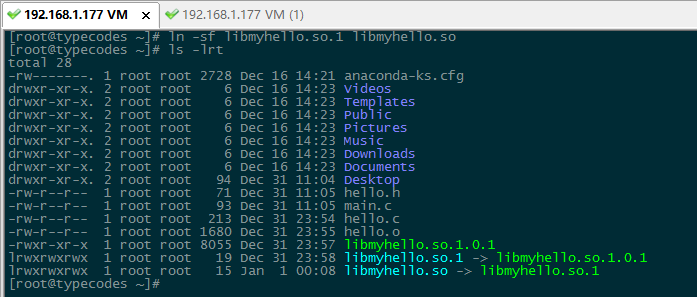
这里如果和前面一样,直接链接创建的动态库文件libmyhello.so生成可执行文件hello,然后直至执行hello,那么也会提示找不到链接的动态库libmyhello.so:
[root@typecodes ~]# gcc -o hello main.c -L. -lmyhello
原因也是一样的,可执行文件hello找不到链接库:
1 2 3 4 5 | |
3.1小节中的方法需要root用户权限,对于非root用户有方法二来解决:如前文《Linux gcc链接动态库出错:LIBRARY_PATH和LD_LIBRARY_PATH的区别》所述,只要在当前Linux系统中配置LD_LIBRARY_PATH变量,就可以搜索到依赖的动态库libmyhello.so。
1 2 3 4 5 6 7 8 9 10 11 12 13 14 15 16 | |

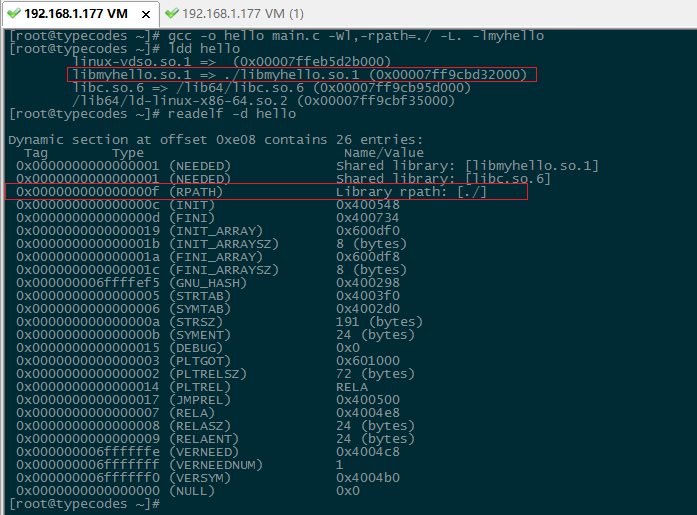
解决方法三:gcc链接动态库生成可执行文件时,加入rpath参数。
[root@typecodes ~]# gcc -o hello main.c -Wl,-rpath=./ -L. -lmyhello
[root@typecodes ~]# ./hello
Welcome to typecodes.com.
libmyhello.so.1.0.1
[root@typecodes ~]#
解决方法四:最简单的操作就是直接将生成的动态库文件拷贝到Linux系统动态库搜索目录下。
/lib、/lib64:                        系统必备共享库
/usr/lib、/usr/lib64:                标准共享库和静态库
/usr/local/lib:                 本地/第三方函数库
4 总结(update 2017.04.18 12:10)
小节2中讲述了静态库文件的生成方法,小节3中讲述了动态库的生成方法。同时,在执行程序时如果报错提示找不到对应的库文件(可以通过readelf -d hello验证),那么一共有4种方法。
1、添加库路径到 /etc/ld.so.conf.d/ 目录下的配置文件中,然后执行命令ldconfig;
2、添加库路径到 LD_LIBRARY_PATH 环境变量中;
3、在编译链接命令中加入参数 -rpath=库文件所在路径 ;
4、最简单的方式:把库文件拷贝到Linux系统库文件所在目录下(/lib、/lib64、/usr/lib、/usr/lib64、/usr/local/lib等)。


Comments »