阿里云CentOS 6.5系统LNMP环境安装SSL证书
近期参加了github的一项优惠活动,获得了一年免费的SSL证书。下面是具体的安装过程,当然SSL证书的安装跟博客程序(不管是wordpress或者typecho等等)无关,只是跟服务器的类型(比如Nginx、Apache或者IIS等)有关。
----------操作说明----------
系统:            阿里云CentOS 6.5
环境:            LNMP(只需配置Nginx服务器就行)
操作工具:        SecureCRT 7.0
博客程序:        Typecho 14.10
SSL证书提供商:    PositiveSSL from Namecheap
一、在web服务器上生成私钥、CSR签名请求文件
###### 1 生成2048bit的RSA私钥文件typecodes.key
[root@typecodes ssl]# openssl genrsa -des3 -out typecodes.key 2048
Generating RSA private key, 2048 bit long modulus
.......................+++
...............+++
e is 65537 (0x10001)
Enter pass phrase for typecodes.key:
Verifying - Enter pass phrase for typecodes.key:  [输入两次相同的密码]
###### 2 生成CSR证书签名请求文件typecodes.csr
[root@typecodes ssl]# openssl req -new -key typecodes.key -out typecodes.csr
Enter pass phrase for typecodes.key:    [输入之前的密码]
You are about to be asked to enter information that will be incorporated
into your certificate request.
What you are about to enter is what is called a Distinguished Name or a DN.
There are quite a few fields but you can leave some blank
For some fields there will be a default value,
If you enter '.', the field will be left blank.
-----
Country Name (2 letter code) [XX]:CN    [国籍]
State or Province Name (full name) []:GuangDong [省份]
Locality Name (eg, city) [Default City]:ShenZhen    [城市]
Organization Name (eg, company) [Default Company Ltd]:TypeCodes.com [公司]
Organizational Unit Name (eg, section) []:TypeCodes.com [行业]
Common Name (eg, your name or your server's hostname) []:TypeCodes.com  [自己的域名]
Email Address []:vfhky@typecodes.com

Please enter the following 'extra' attributes
to be sent with your certificate request
A challenge password []:    [这里不填]
An optional company name []:    [这里不填]
###### 3 去掉密钥文件typecodes.key的密码  【强烈推荐】
[root@typecodes ssl]# cp typecodes.key typecodes.key.origin
[root@typecodes ssl]# openssl rsa -in typecodes.key.origin -out typecodes.key
Enter pass phrase for typecodes.key.origin:
writing RSA key [输入之前的密码]
###### 4 当然也可用openssl通过私钥和CSR自己生成签名文件,但是可能不被浏览器认可,所以本步骤应该跳过
[root@typecodes ssl]# openssl x509 -req -days 365 -in typecodes.csr -signkey typecodes.key -out typecodes.crt
Signature ok
subject=/C=CN/ST=GuangDong/L=ShenZhen/O=TypeCodes.com/OU=TypeCodes.com/CN=TypeCodes.com/emailAddress=vfhky@typecodes.com
Getting Private key
###### 5 查看上面4个步骤所产生的文件,其中typecodes.crt是不需要的
[root@typecodes ssl]# ls
typecodes.crt  typecodes.csr  typecodes.key  typecodes.key.origin
二、获取SSL证书提供商发放的数字证书
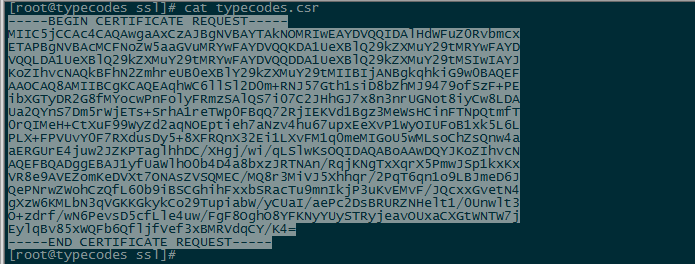
首先进入Namecheap的SSL证书管理界面,然后点击“Active Now”按钮准备购入SSL产品。这时会进入“Digital Certificate Order Form”页面,根据自己的web服务器类型在“Select Web Sever”中选择,博主的是Nginx。接着在SecureCRT终端上执行命令 [root@typecodes ssl]# cat typecodes.csr ,然后复制从 -----BEGIN CERTIFICATE REQUEST----- 到 -----END CERTIFICATE REQUEST----- 中的所有内容再粘贴到“Enter csr”下面的空白栏中。

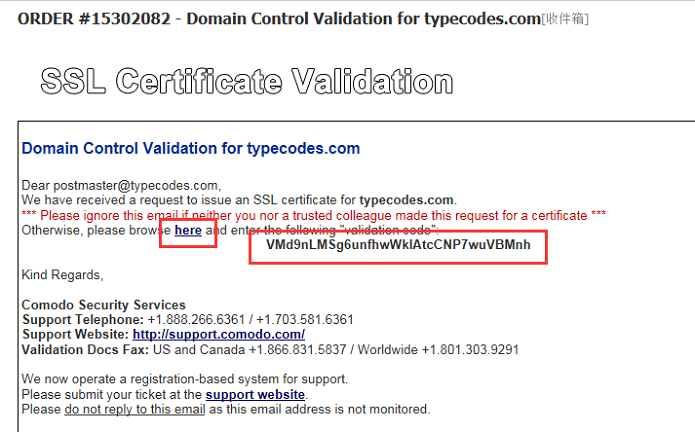
最后点击“Next”,这时的界面会显示你的域名Whois信息上的相关邮箱地址列表,你需要选择能正常接收验证码的域名邮箱(注意:使用了第三方如QQ企业邮箱等,在页面是不能显示出来的)。填写完使用者的相关信息(像城市名、街道名等等尽量使用英文,中文可能会出错)后,Namecheap会发一封有验证码的邮件到你选择的域名邮箱中,进入邮箱点击“here”按钮,然后输入验证码即可完成SSL订单。这时,Namecheap会把PositiveSSL证书文件通过邮件发送到自己的邮箱发送证书邮件。

三、配置服务器中Nginx文件
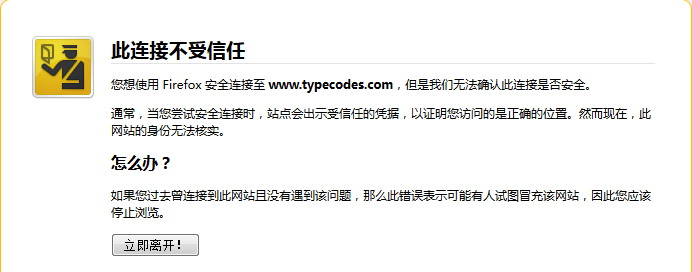
SSL证书提供商会在邮件中提供我们需要的四个.crt文件:域名证书文件typecodes_com.crt、COMODORSADomainValidationSecureServerCA.crt、COMODORSAAddTrustCA.crt、根证书文件AddTrustExternalCARoot.crt ,把它们导入到web服务器中的某个目录,例如/etc/nginx/ssl。一般情况下,直接用域名证书typecodes_com.crt即可受到浏览器(例如chrome等)的信任。但是为了避免在火狐firefox中出现“此连接不受信任”的警告,需要按照以下顺序合并所有证书文件,然后重新生成一个.crt文件:
[root@typecodes ssl]# cat typecodes_com.crt COMODORSADomainValidationSecureServerCA.crt COMODORSAAddTrustCA.crt AddTrustExternalCARoot.crt > typecodes_last.crt
最后,我们需要修改Nginx的配置文件(/etc/nginx/conf.d/default.conf)来让Nginx启用https协议,示例如下:
###### 开始配置Nginx文件,支持http协议跳转到https协议
[root@typecodes conf.d]# vi default.conf
###### 新增一个“server”,保留原80端口,并强制将http协议转换到https协议
server {
    listen 80;
    server_name www.typecodes.com;
    rewrite ^(.*) https://$server_name$1 permanent;
}
###### 在原“server”中,启用支持https协议的443端口,并配置相关信息
server {
    listen 443;
    server_name  www.typecodes.com;

    ssl on;
    # 最后新生成.crt文件
    ssl_certificate /etc/nginx/ssl/typecodes_last.crt;
    # 最开始生成.key文件
    ssl_certificate_key /etc/nginx/ssl/typecodes.key;
    ssl_session_cache shared:SSL:10m;
    ssl_session_timeout 10m;
    ssl_ciphers ALL:!aNULL:!ADH:!eNULL:!LOW:!EXP:RC4+RSA:+HIGH:+MEDIUM; #Disables all weak ciphers
    ssl_protocols SSLv3 TLSv1; #enables SSLv3/TLSv1, but not SSLv2 which is weak and should no longer be used.
    ssl_prefer_server_ciphers on;
    ***************省略其它不变的部分****************
}
###### 重启Nginx服务
[root@typecodes conf.d]# service nginx restart
这时访问www.typecodes.com或者typecodes.com都会自动跳转到https://www.typecodes.com了。因此,大功告成!
四、解决可能出现的问题
4.1 SSL证书在Firefox浏览器中出现警告
解决方法是如上面的操作所示,将所有证书文件合并即可。

4.2 解决"Chain issues - Contains anchor"的问题
如果在ssllabs.com中进行SSL效果测试时,发现"Chain issues - Contains anchor"的问题,那么可以尝试不要把AddTrustExternalCARoot.crt证书内容添加到最终合成的证书typecodes_last.crt中去。
[root@typecodes ssl]# cat typecodes_com.crt COMODORSADomainValidationSecureServerCA.crt COMODORSAAddTrustCA.crt > typecodes_last.crt
4.3 密钥.key文件的密码弄错
nginx: [emerg] SSL_CTX_use_PrivateKey_file("/etc/nginx/typecodes.key") failed (SSL: error:28069065:lib(40):UI_set_result:result too small:You must type in 4 to 1024 characters error:0906406D:PEM routines:PEM_def_callback:problems getting password error:0906A068:PEM routines:PEM_do_header:bad password read error:140B0009:SSL routines:SSL_CTX_use_PrivateKey_file:PEM lib)
nginx: configuration file /etc/nginx/nginx.conf test failed
在生成密钥.key文件时,需要重复输入相同的密码两次,如果在接下来的步骤中输入错误的密码,就会出现上面这个错误。所以,我们最好执行上面推荐的步骤,去掉密码!
4.4 crt域名证书和密钥.key文件不匹配,则需要重头开始操作:
nginx: [emerg] SSL_CTX_use_PrivateKey_file("/etc/inx/decryptedprivate.key") failed (SSL: error:0B080074:x509 certificate routines:X509_check_private_key:key values mismatch)
nginx: configuration file /etc/inx.conf test failed
我们可以通过 https://www.sslchecker.com/matcher 进行匹配验证:把邮件中的域名证书 typecodes_com.crt 中的内容粘贴到第一个栏目中,把最初生成的 typecodes.key 中的内容填写到第二栏中,然后点击“Match”按钮,结果显示如图绿色提示“CSR match SSL” 则说明证书和密钥匹配。当然把之前生成的 typecodes.csr 中的内容粘贴到第二栏中也是匹配的。
五、针对typecho博客的数据库改动
操作数据库前,记得先备份!
5.1 更改博客url地址
select * from typecho_options where name = 'siteUrl';
update typecho_options set value = 'https://www.typecodes.com' where name = 'siteUrl';
5.2 更改博客作者的地址以及新浪SCS图片的路径
select * from typecho_users where name = 'user_name';
update typecho_users set url = 'https://www.typecodes.com' where name = 'user_name';
UPDATE `typecho_contents` SET `text` = REPLACE(`text`,'http://www.typecodes.com/usr/uploads/','https://cdn.typecodes.com/');


Comments »