2015博客升级记(二):Linux系统磁盘分区挂载和交换空间
这是《2015年博客升级记》系列文章的第二篇,主要记录在Linux系统中如何将磁盘进行分区和挂载。
------------操作说明------------
Linux系统:       阿里云CentOS 7.1(20G)
操作工具:        SecureCRT 7.0
待挂载的数据盘:   24G
分区目标:        先分4G作为CentOS7.1系统的交换空间,剩余20G作为普通物理空间
1 查看当前Linux系统分区信息
由于阿里云主机默认系统盘大小为20G,通过命令df -h可以看到分区/dev/xvda1挂载在当前CentOS7.1系统的根目录/下面,系统本身占用了2.1G空间。
[root@typecodes ~]# df -h
Filesystem      Size  Used Avail Use% Mounted on
/dev/xvda1       20G  2.1G   17G   12% /
devtmpfs        489M     0  489M   0% /dev
tmpfs           497M     0  497M   0% /dev/shm
tmpfs           497M  6.5M  490M   2% /run
tmpfs           497M     0  497M   0% /sys/fs/cgroup
2 列出所有安装的磁盘及分区信息
那么,如果主机上还存在额外的未挂载的磁盘,我们可以通过fdisk -l查看这些磁盘的信息。如下所示,磁盘/dev/xvda是阿里云主机自带的,然后被划分成了分区/dev/xvda1;而磁盘/dev/xvdb就是24G大小(实际为25.8G)的阿里云数据盘(还未进行分区)。
[root@typecodes ~]# fdisk -l

Disk /dev/xvda: 21.5 GB, 21474836480 bytes, 41943040 sectors
Units = sectors of 1 * 512 = 512 bytes
Sector size (logical/physical): 512 bytes / 512 bytes
I/O size (minimum/optimal): 512 bytes / 512 bytes
Disk label type: dos
Disk identifier: 0x0009e68a

    Device Boot      Start         End      Blocks   Id  System
/dev/xvda1   *        2048    41943039    20970496   83  Linux

Disk /dev/xvdb: 25.8 GB, 25769803776 bytes, 50331648 sectors
Units = sectors of 1 * 512 = 512 bytes
Sector size (logical/physical): 512 bytes / 512 bytes
I/O size (minimum/optimal): 512 bytes / 512 bytes
3 开始将磁盘进行分区
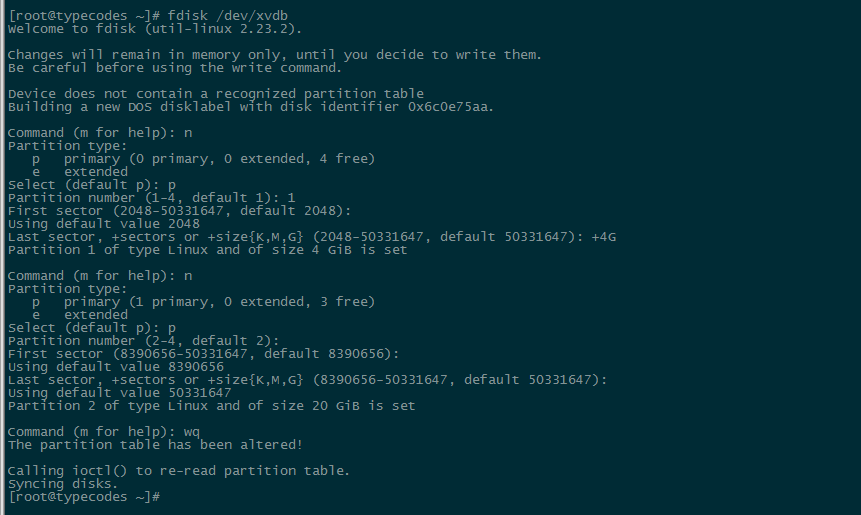
按照先前设定的目标,将磁盘/dev/xvdb划分成两个区:一区用于CentOS7.1系统的交换空间,二区就是普通的Linux物理空间,用作仓库存放备份的数据库文件、程序等等。
[root@typecodes ~]# fdisk /dev/xvdb
Welcome to fdisk (util-linux 2.23.2).

Changes will remain in memory only, until you decide to write them.
Be careful before using the write command.

Device does not contain a recognized partition table
Building a new DOS disklabel with disk identifier 0x6c0e75aa.

################开始分区1##################
Command (m for help): n     [第1步:输入n,代表新建分区]
Partition type:
   p   primary (0 primary, 0 extended, 4 free)
   e   extended
Select (default p): p       [第2步:输入p或直接回车]
Partition number (1-4, default 1): 1            [第3步:输入区号1]
First sector (2048-50331647, default 2048):    [第4步:直接回车]
Using default value 2048
Last sector, +sectors or +size{K,M,G} (2048-50331647, default 50331647): +4G        [第5步:划分4G空间]
Partition 1 of type Linux and of size 4 GiB is set
同样,使用fdisk /dev/xvdb命令划分区域2。需要说明的是,因为需要将剩余的20G空间全部划分到区域2,所以在第5步Last sector, +sectors or +size{K,M,G} (8390656-50331647, default 50331647)一栏中直接回车即可。这里省略具体执行过程,附图如下:

4 开始格式化刚划分的第1和第2分区
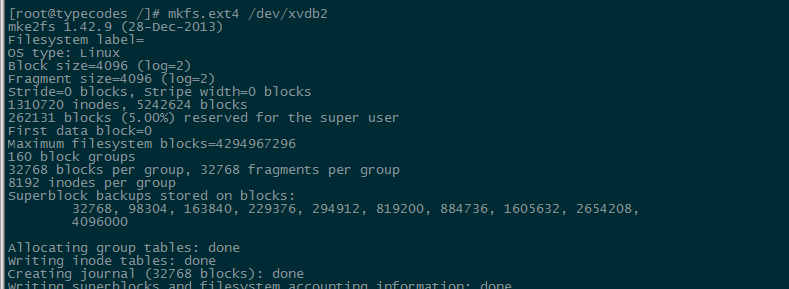
开始分别将分区/dev/xvdb1和/dev/xvdb2格式化为ext4文件系统:
[root@typecodes /]# mkfs.ext4 /dev/xvdb1
mke2fs 1.42.9 (28-Dec-2013)
Filesystem label=
OS type: Linux
Block size=4096 (log=2)
Fragment size=4096 (log=2)
Stride=0 blocks, Stripe width=0 blocks
262144 inodes, 1048576 blocks
52428 blocks (5.00%) reserved for the super user
First data block=0
Maximum filesystem blocks=1073741824
32 block groups
32768 blocks per group, 32768 fragments per group
8192 inodes per group
Superblock backups stored on blocks:
        32768, 98304, 163840, 229376, 294912, 819200, 884736

Allocating group tables: done
Writing inode tables: done
Creating journal (32768 blocks): done
Writing superblocks and filesystem accounting information: done
同样使用命令mkfs.ext4 /dev/xvdb2格式化分区/dev/xvdb2为ext4文件系统,这里省略具体执行过程,附图如下:

5 指定第1分区类型为linux Swap分区
将第1分区/dev/xvdb1指定为当前CentOS7.1系统的交换空间,这对Linux系统来说是很重要的一部分。Linux系统可用的虚拟内存的总量等于物理内存(硬件的内存)和交换空间的总和。设置交换空间Swap的好处在于:当系统的物理内存耗尽时,系统调度将那些长时间没有什么操作的程序所占用的物理内存中的一部分空间释放出来,并临时保存到Swap交换空间中。等到那些程序要运行时,再将保存的数据从Swap中恢复到内存中。
这里将分区1/dev/xvdb1改成Swap分区类型,最终操作如下图所示,其中82表示Linux系统Swap交换空间的文件类型。

6 使用mkswap命令设置交换分区
[root@typecodes /]# mkswap /dev/xvdb1
mkswap: /dev/xvdb1: warning: wiping old ext4 signature.
Setting up swapspace version 1, size = 2097148 KiB
no label, UUID=4c90adae-7459-4a99-8999-fef130ff3da1

###############激活swap分区###############
[root@typecodes /]# swapon -a /dev/xvdb1

###############查看swap分区###############
[root@typecodes /]# swapon -s       [或 free 或 cat /proc/swaps]
Filename        Type        Size        Used    Priority
/dev/xvdb1      partition   2097148     0       -1
7 将分区2挂载到CentOS系统目录
根据目标设定,这里将分区2/dev/xvdb2挂载到我的CentOS7.1系统的mydata目录下面,用于存储仓库。
######在系统根目录新建mydata目录,并将分区2挂载到这个目录
[root@typecodes /]# mkdir /mydata
[root@typecodes /]# mount /dev/xvdb2 /mydata
8 将分区1和分区2的信息分别追加到系统/etc/fstab文件中
Linux系统/etc/fstab文件中包含了当前主机磁盘分区以及存储设备如何挂载的信息,所以我们需要将分区1、2的信息分别写入到这个文件中。
[root@typecodes /]# echo '/dev/xvdb1              swap               swap   defaults        0 0' >> /etc/fstab
[root@typecodes /]# echo '/dev/xvdb2              /mydata            ext4   defaults        0 0' >> /etc/fstab
9 最后查看效果
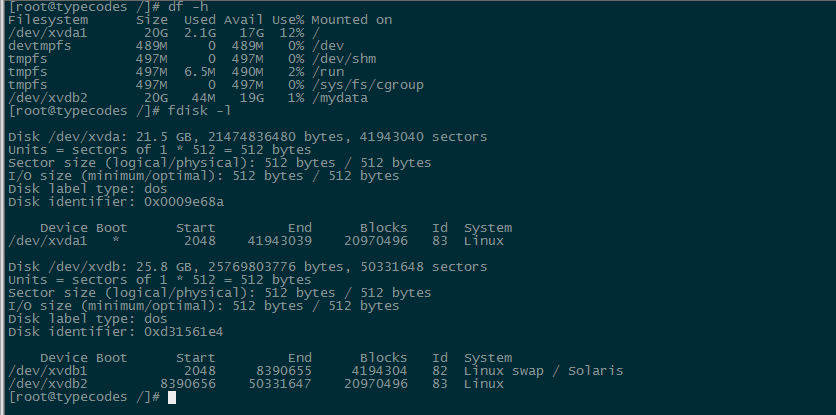
最后,通过命令df -h和fdisk -l查看分区挂载效果如下图所示:


Comments »